Data4Life Test Result Delivery solution architecture
Receive laboratory test results securely
Data4Life develops and operates a data platform called Personal Health Data Platform (PHDP) that uses end-to-end encryption to allow users to securely store and access healthcare data, receive healthcare data from external sources (like laboratories or hospitals), and selectively share data with third parties (like doctors or other healthcare professionals).
In this blog post, we explain how our Test Result Delivery solution enables users to receive laboratory test results (like coronavirus test results) in a secure manner.
The testing process
Medical staff at the testing site (for example, at an airport) will administer a throat swab test which produces a saliva sample in a plastic test tube. This test tube is sent to the laboratory where its moist contents await a PCR test (polymerase chain reaction) which can detect traces of the virus’s genetic material.
The test results (negative or positive) must then be confidentially communicated to the patient. This typically happens via a telephone call. Our Test Result Delivery solution speeds up this communication and allows the patient to persist the results in our secure data platform.
Security requirements
To deliver a test result to a user, we obviously must be able to link a user to a test tube and the test tube to the corresponding result. This must, however, happen without giving up any information to any participating party as to which test result belongs to which user.
How it works
Before getting throat-swabbed, the user opens our Test Result Delivery app and generates a so-called external order number, or EON for short. This is a 10-digit number which is displayed as a barcode in the app.
The medical staff at the testing site will scan that barcode and thus associate the user’s test tube with that EON. Think of it as writing this 10-digit number on the test tube, before sending it off to the laboratory. This is illustrated in steps (A) to (D) of Figure 1.
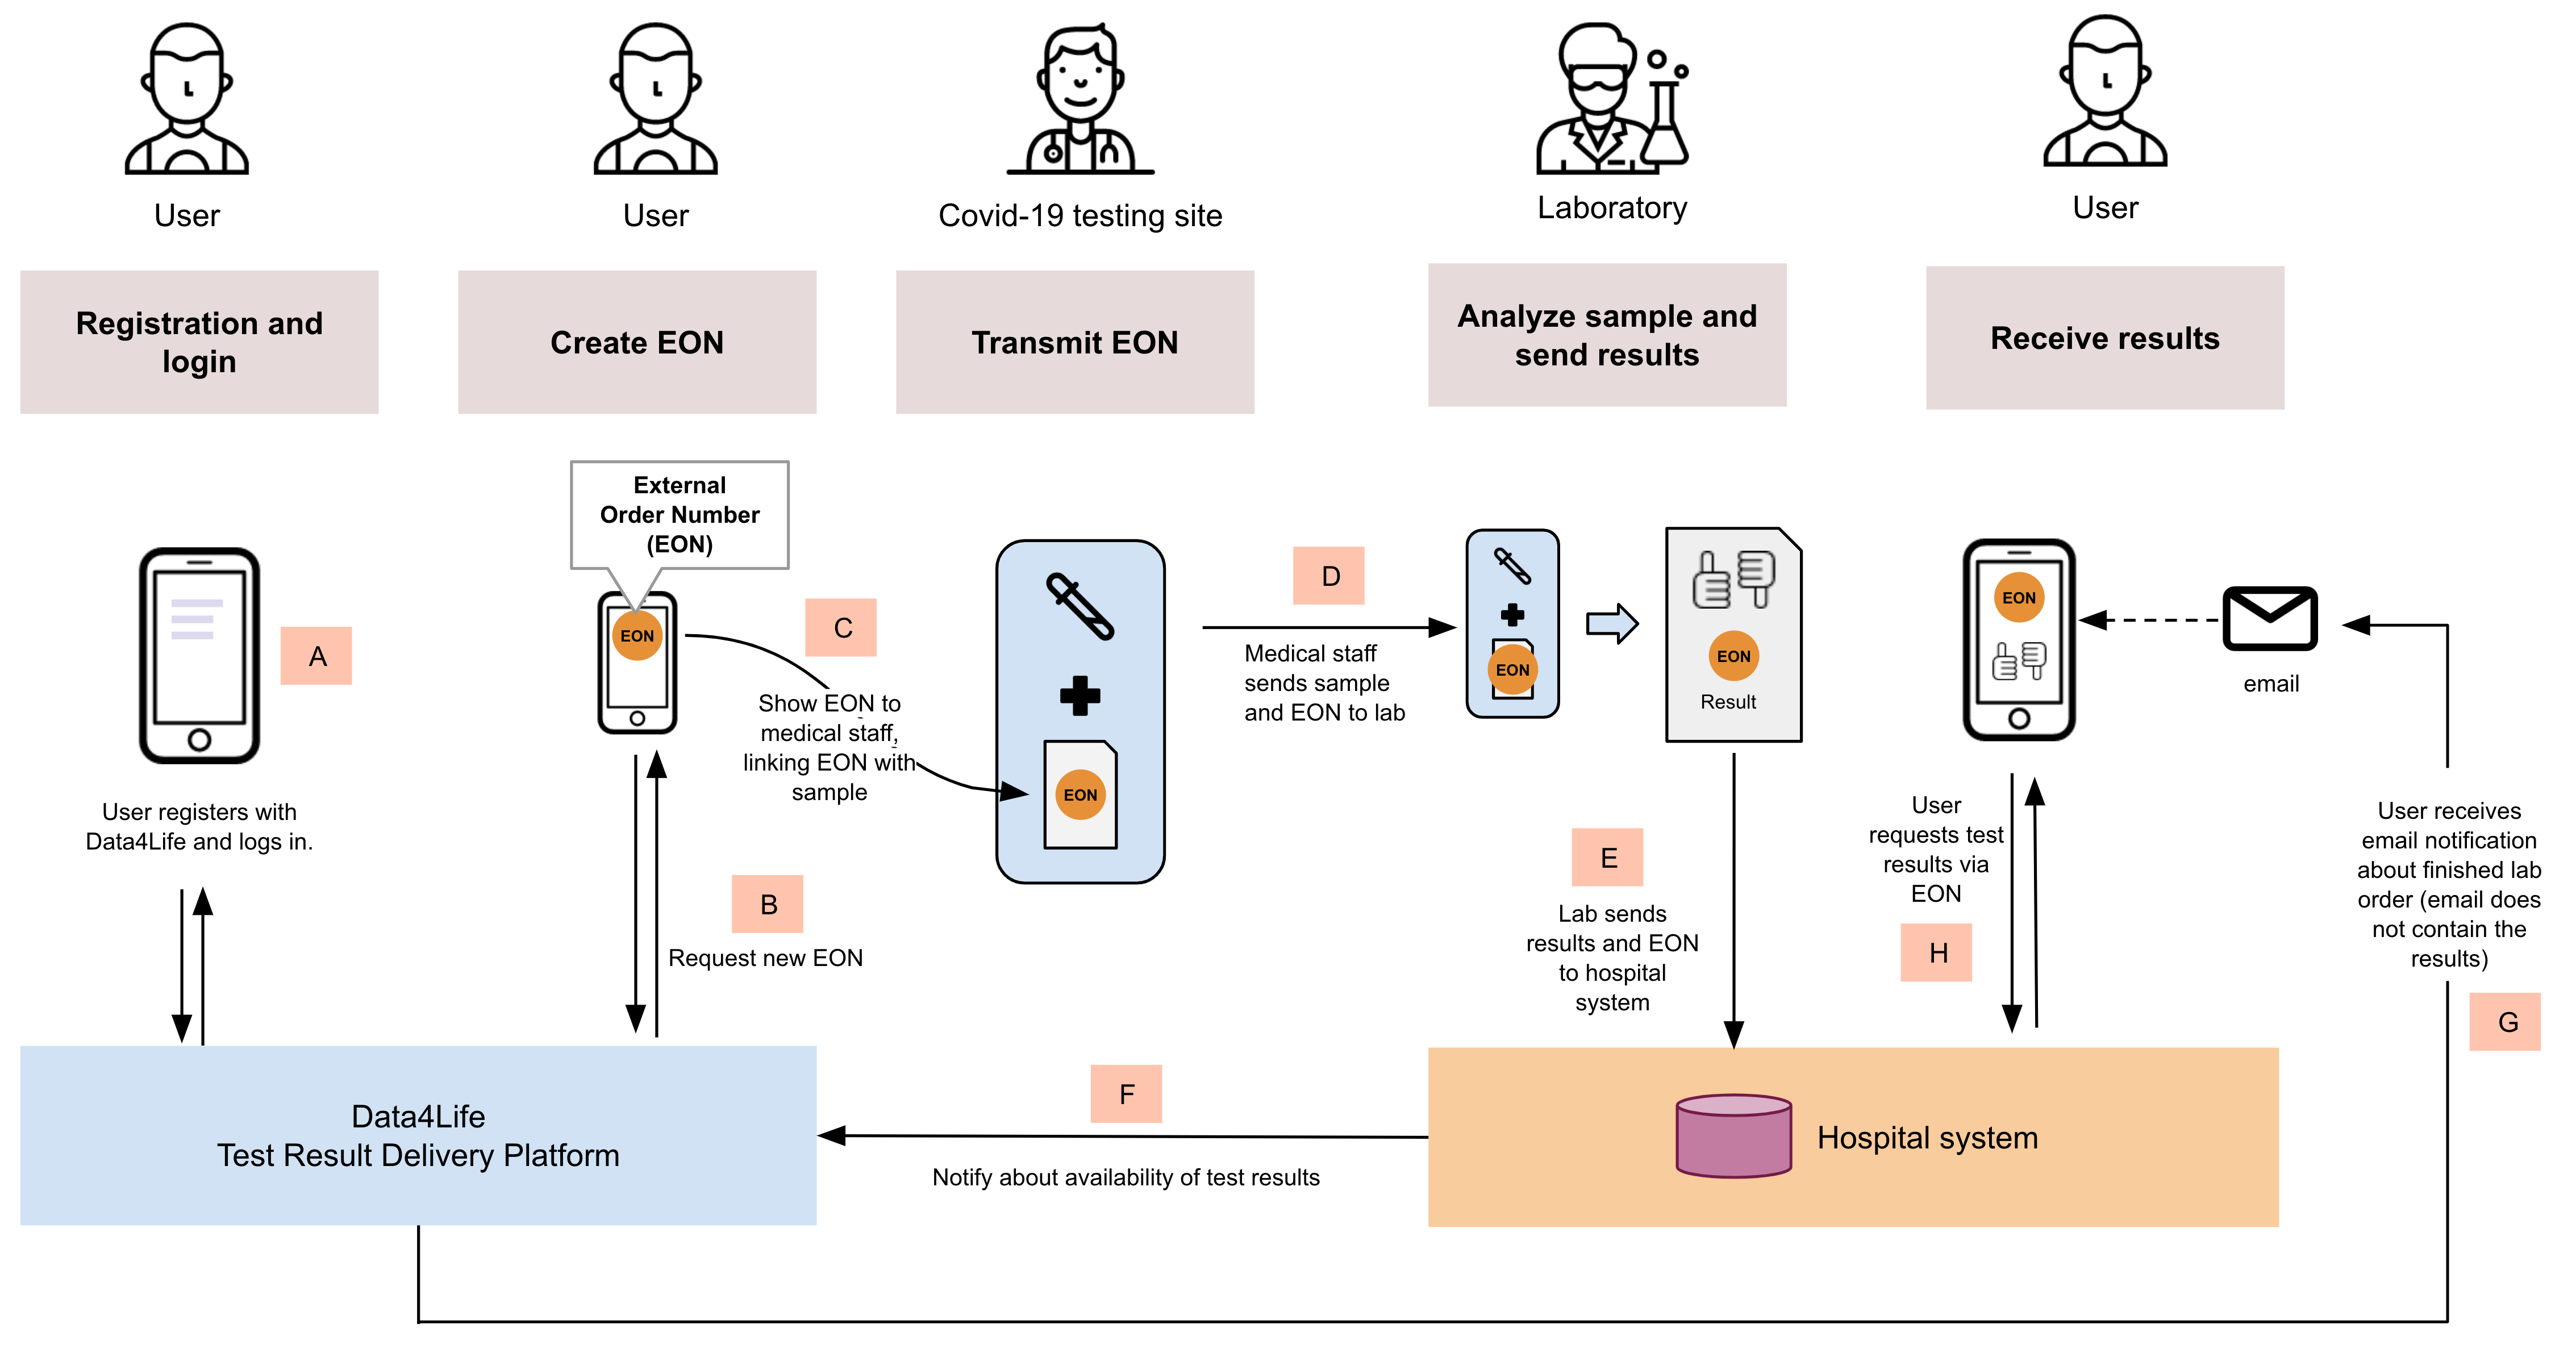
Figure 1: High-level flow to deliver test results
When the test results are available at the laboratory, they are sent to the hospital system (E) where they are stored under the EON. In addition, the hospital system contacts our Test Result Delivery solution (F) to notify the user via email about the availability of the test results (G).
It might now seem straightforward to close the loop and allow the user to query his test results from the hospital system in exchange for the EON, because it was the number he put on the test tube in the first place, right?
This idea is problematic because giving an EON the power to collect a test result means that anybody who has seen an EON could do it in lieu of the user. An EON, however, is not completely private. The medical staff at the testing site has seen the EON (the number is printed below the barcode in case the scanner has problems and the EON must be entered manually), and the staff at the laboratory may have seen it, too (they do not know the user, though, but this is not the point).
The point is to prevent that anybody other than the user can possibly collect the test results. That is, we cannot use the EON in step (H) above to collect the results.
How it really works
To discuss the internals of our solution, we must lift the hood and draw a new picture. We use the diagrams in figures 2 and 3 to revisit the process sketched above; blue components represent the contents of our Test Result Delivery solution shown in Figure 1. The user agent is the user’s browser in which our app is running.
Also, in production, the orange box “hospital systems” contains multiple services operated by the hospital itself or by external service providers. For example, the service that actually generates the EON is operated by our partner HealthMetrix. Since the focus of this texts is the explanation of our solution, we subsume those external services as “hospital systems”.
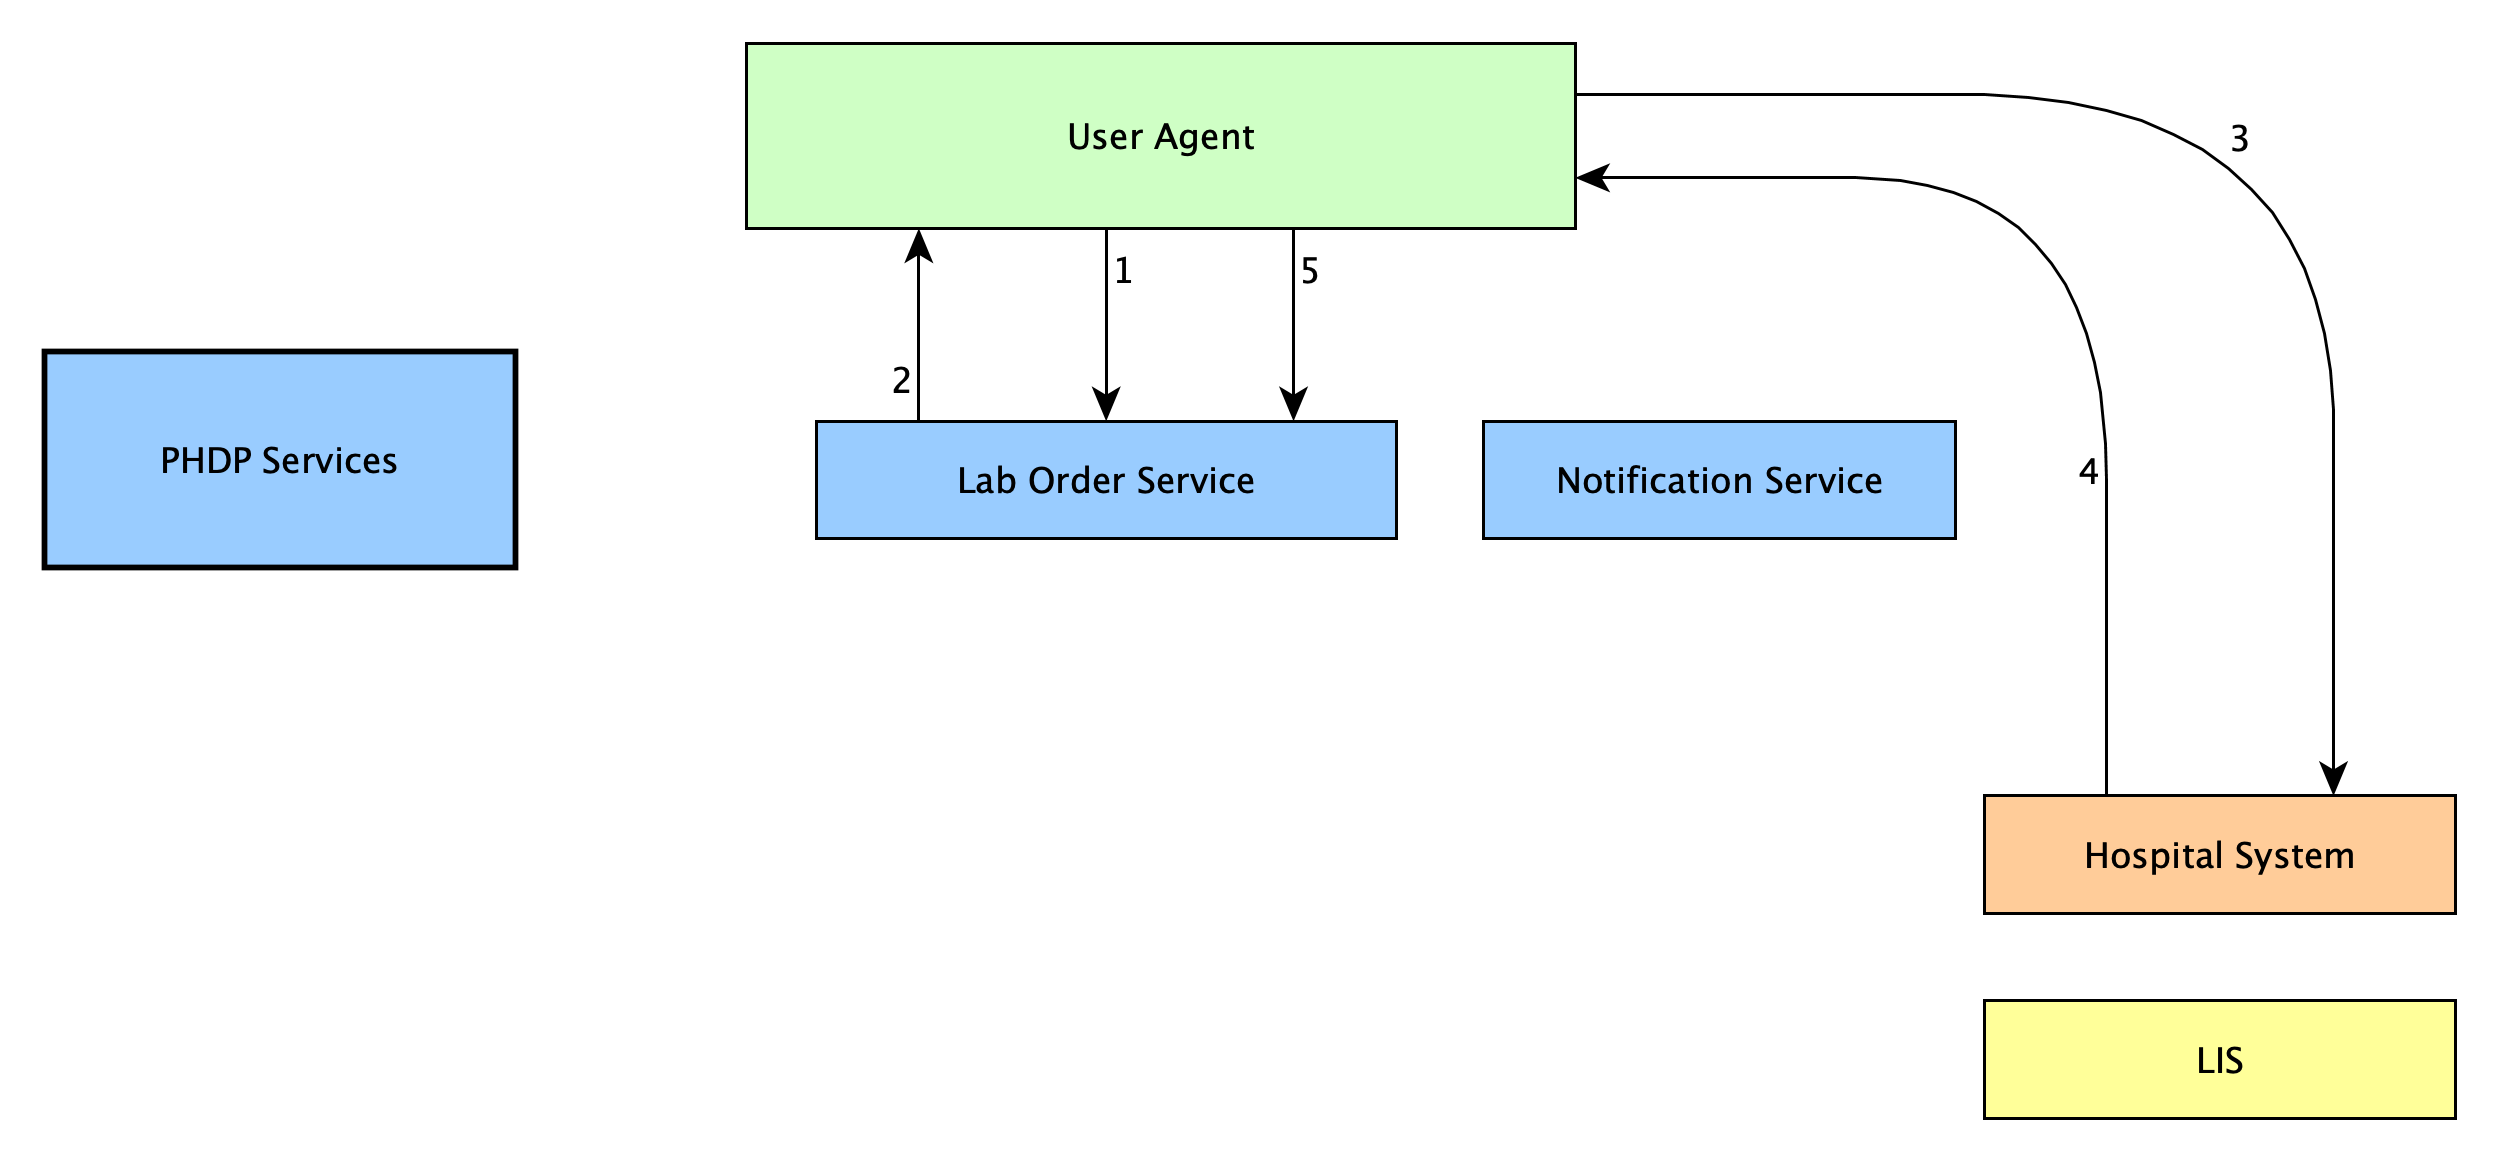
Figure 2: Registering a test tube
Let’s start again at the testing site where the user is about to get a saliva sample taken. The user clicks a button in the app and requests an EON (1). This request hits our backend, more precisely, the Lab Order service.
We need to be careful here: The notion of a “lab order” will pop up multiple times in the remainder of this blog post (and in multiple spots in Figures 2 and 3). From the laboratory’s point of view, a lab order is composed of the test tube together with some paperwork (including the attached EON).
To our Lab Order service at this point in the process, a lab order is just a record in the database containing the following elements:
| Field | Explanation/Value |
|---|---|
lab_order_id |
Random UUID for internal use |
notification_id |
Random UUID used later by the hospital system to notify us about available test results |
eon |
EON, but null for now |
status |
"unassigned" |
datetime_created |
Current date and time |
user_id |
User's ID |
Our Lab Order service is not responsible for creating EONs. This is done by the hospital system.
In step 2, the Lab Order service returns the following data:
The notification_id which will be crafted into a URL that the hospital system later uses to notify us about available test results.
A so-called creation token. This is a JSON Web Token whose subject is the SHA256 hash of the user’s ID. As we'll see, this token serves as an authentication token in the next step. This token is not persisted by the Lab Order service.
We still have no EON, so let’s get one from the hospital system (3). To authenticate this request, we'll attach the creation token we just received from the Lab Order service. In addition, we supply a notification URL which points back to our Lab Order service and includes the notification_id.
The hospital system first verifies the token’s signature. It can also use the subject of the token to rate limit the EON requests. For this, it’s sufficient to have the SHA256 hash of the user ID and not the user ID itself.
The hospital system not only creates a fresh EON, but also a retrieval token. As the name suggests, it is this token that must be used for test results retrieval later. Both EON and retrieval token are returned to our app in step 4.
The retrieval token must be protected as if it was personal health data, because it is later used to retrieve such data. This is why the retrieval token is encrypted (using the same end-to-end encryption mechanism that we use in our PHDP) and the ciphertext is stored by the Lab Order service (5). The lab order data now gets added the following fields:
| Field | Explanation/Value | |
|---|---|---|
eon |
EON (in plaintext) which was received from hospital system | |
status |
Changes to "pending" |
|
encrypted_retrieval_token |
Ciphertext of the retrieval token. In fact, there are multiple ciphertexts stored in practice, but describing the crypto protocol of PHDP goes beyond the scope of this blog post. Trust us that the retrieval token is only decryptable in the app by the user who encrypted it! |
This effectively concludes the steps that are happening while the user is at the testing site. Figure 3 shows what happens when test results become available.
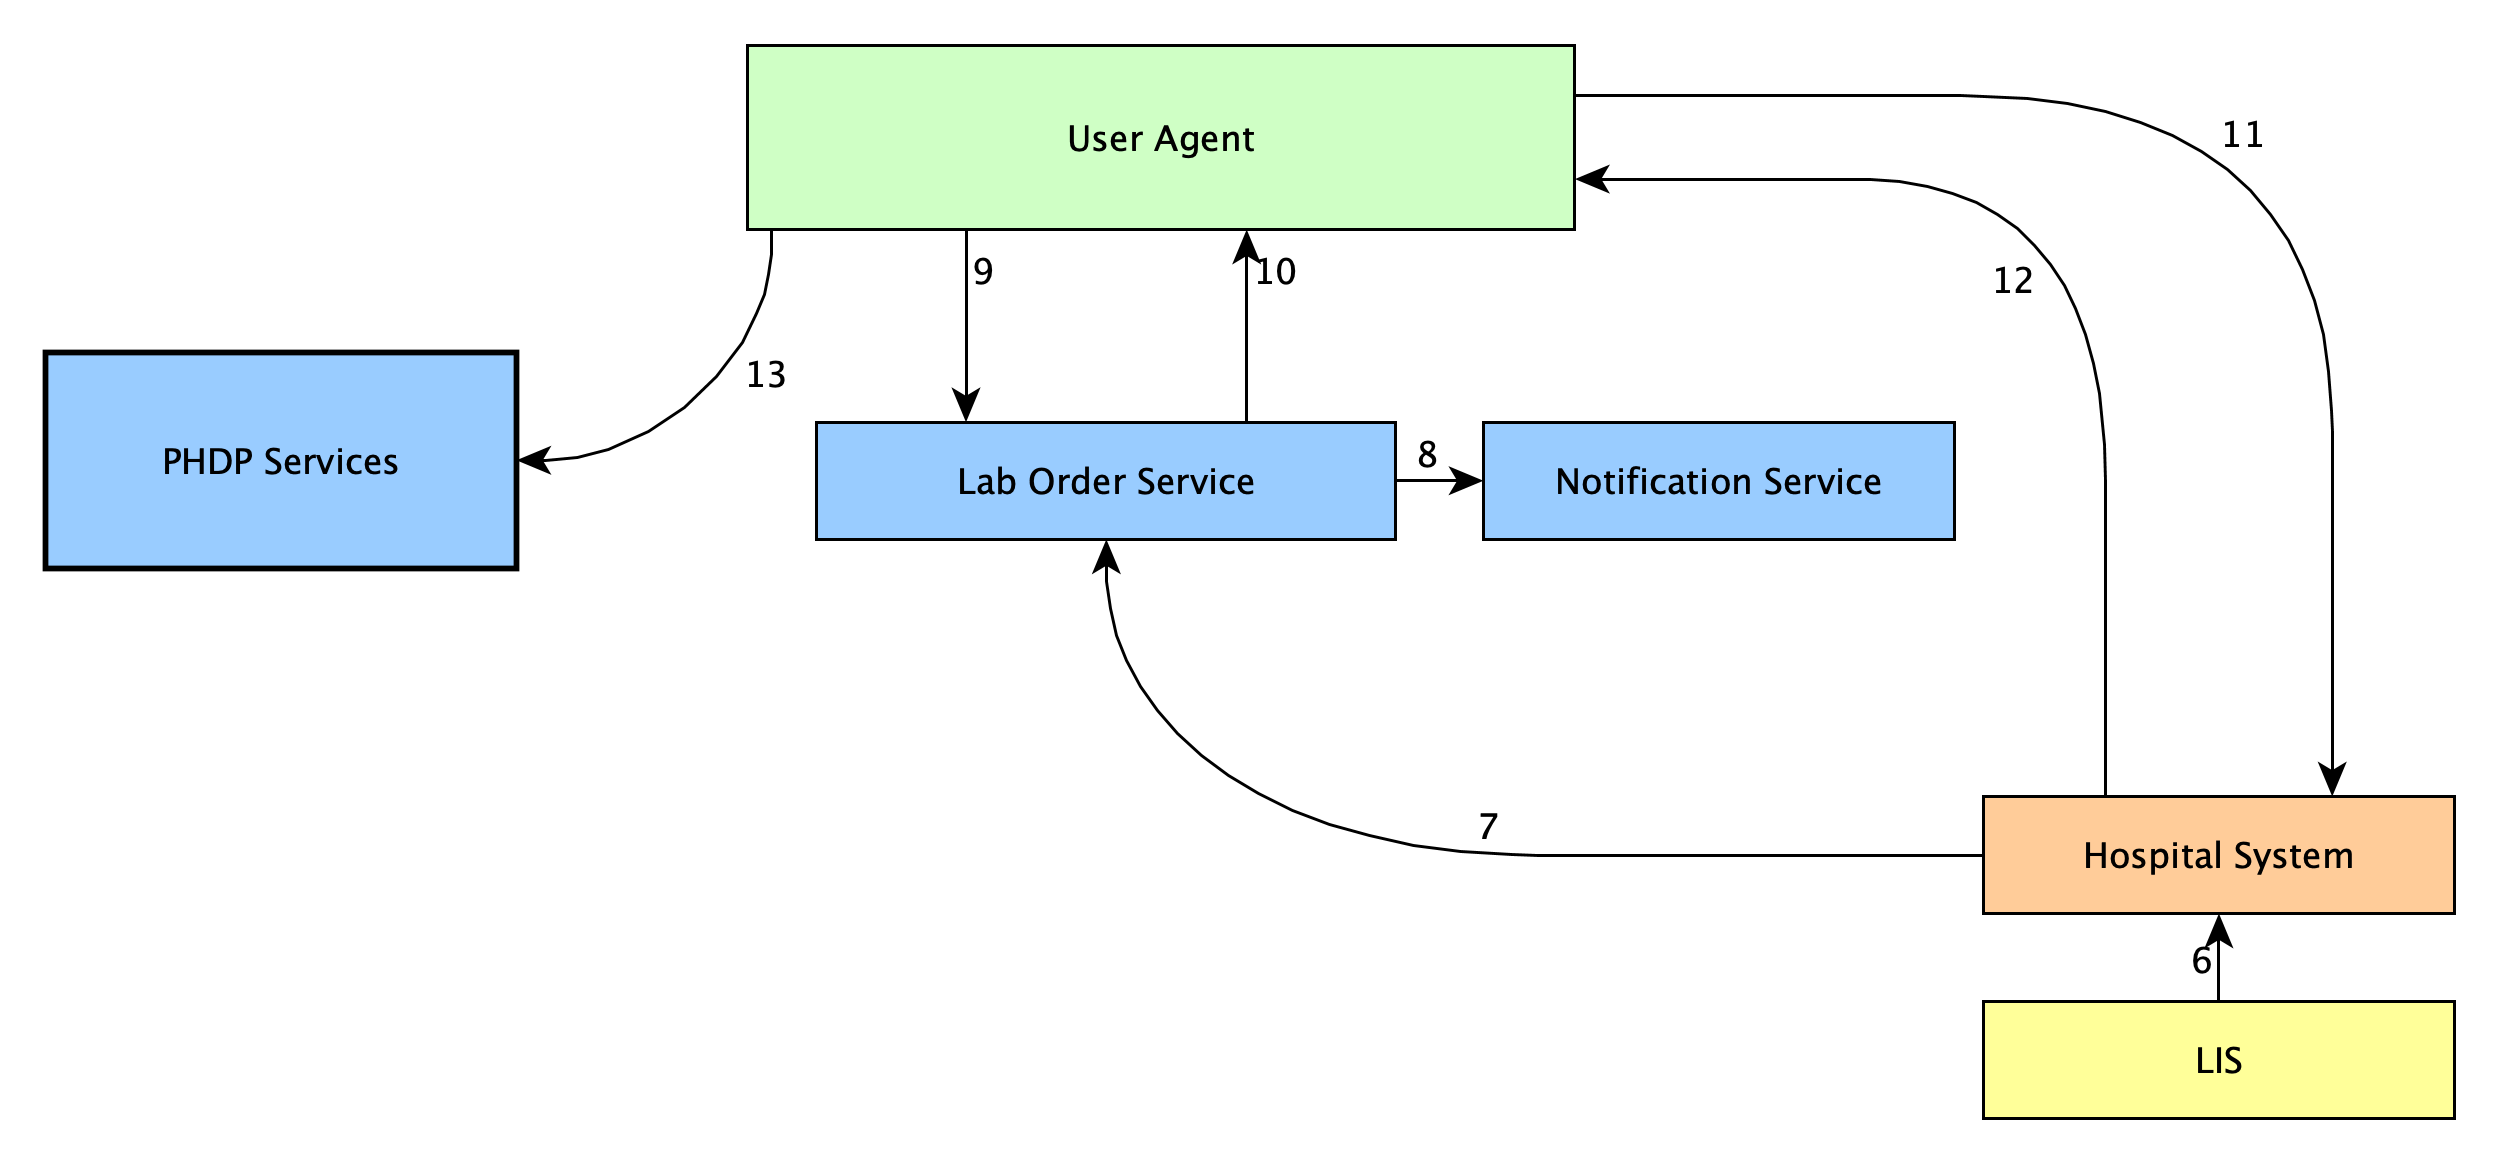
Figure 3: Delivering a test result to the user
The laboratory information system (LIS) sends the results to the hospital system (6). This request includes the EON (which the laboratory knows about because it was attached to the test tube). The hospital system looks up the notification URL via the EON and requests it (7). Remember that the notification URL contains the notification_id – which allows our Lab Order service to retrieve the corresponding lab order record containing the user ID. The user ID allows our Notification service to look up the user’s email address and send a notification (8). Also, the Lab Order service records the following information:
| Field | Explanation/Value |
|---|---|
status |
"done" |
datetime_notification_received |
Current date and time |
cds_notification_job_id |
ID of notification service job |
As mentioned earlier, the notification email does not contain any test results, just the information that they're available. Note that this isn't just a choice of business logic: The Lab Order service cannot possibly know these results, because the retrieval token needed to collect them is not present in plaintext.
After receiving the notification email, the user opens the app, which will request from the Lab Order service all laboratory orders that have changed to status "done" (9). Let’s assume for the sake of simplicity that there is only one such lab order. Its data will be returned in step (10) together with a so-called collection token. This token is similar to the creation token we used in step (3): Its subject is the SHA256 hash of the user ID and it will be used to authenticate against the hospital system in the next call. The collection token is not persisted by the Lab Order service. The lab order information in the answer (10) contains the encrypted_retrieval_token which the app can decrypt. The app can now request the test results from the hospital system using the decrypted retrieval token together with the collection token (11).
The hospital system retrieves the test results based on the retrieval token – remember, it handed out that token for exactly that purpose before – and returns them to our app (12) where they are displayed. The user can choose to upload the results into his PHDP for future reference.
Our app in action
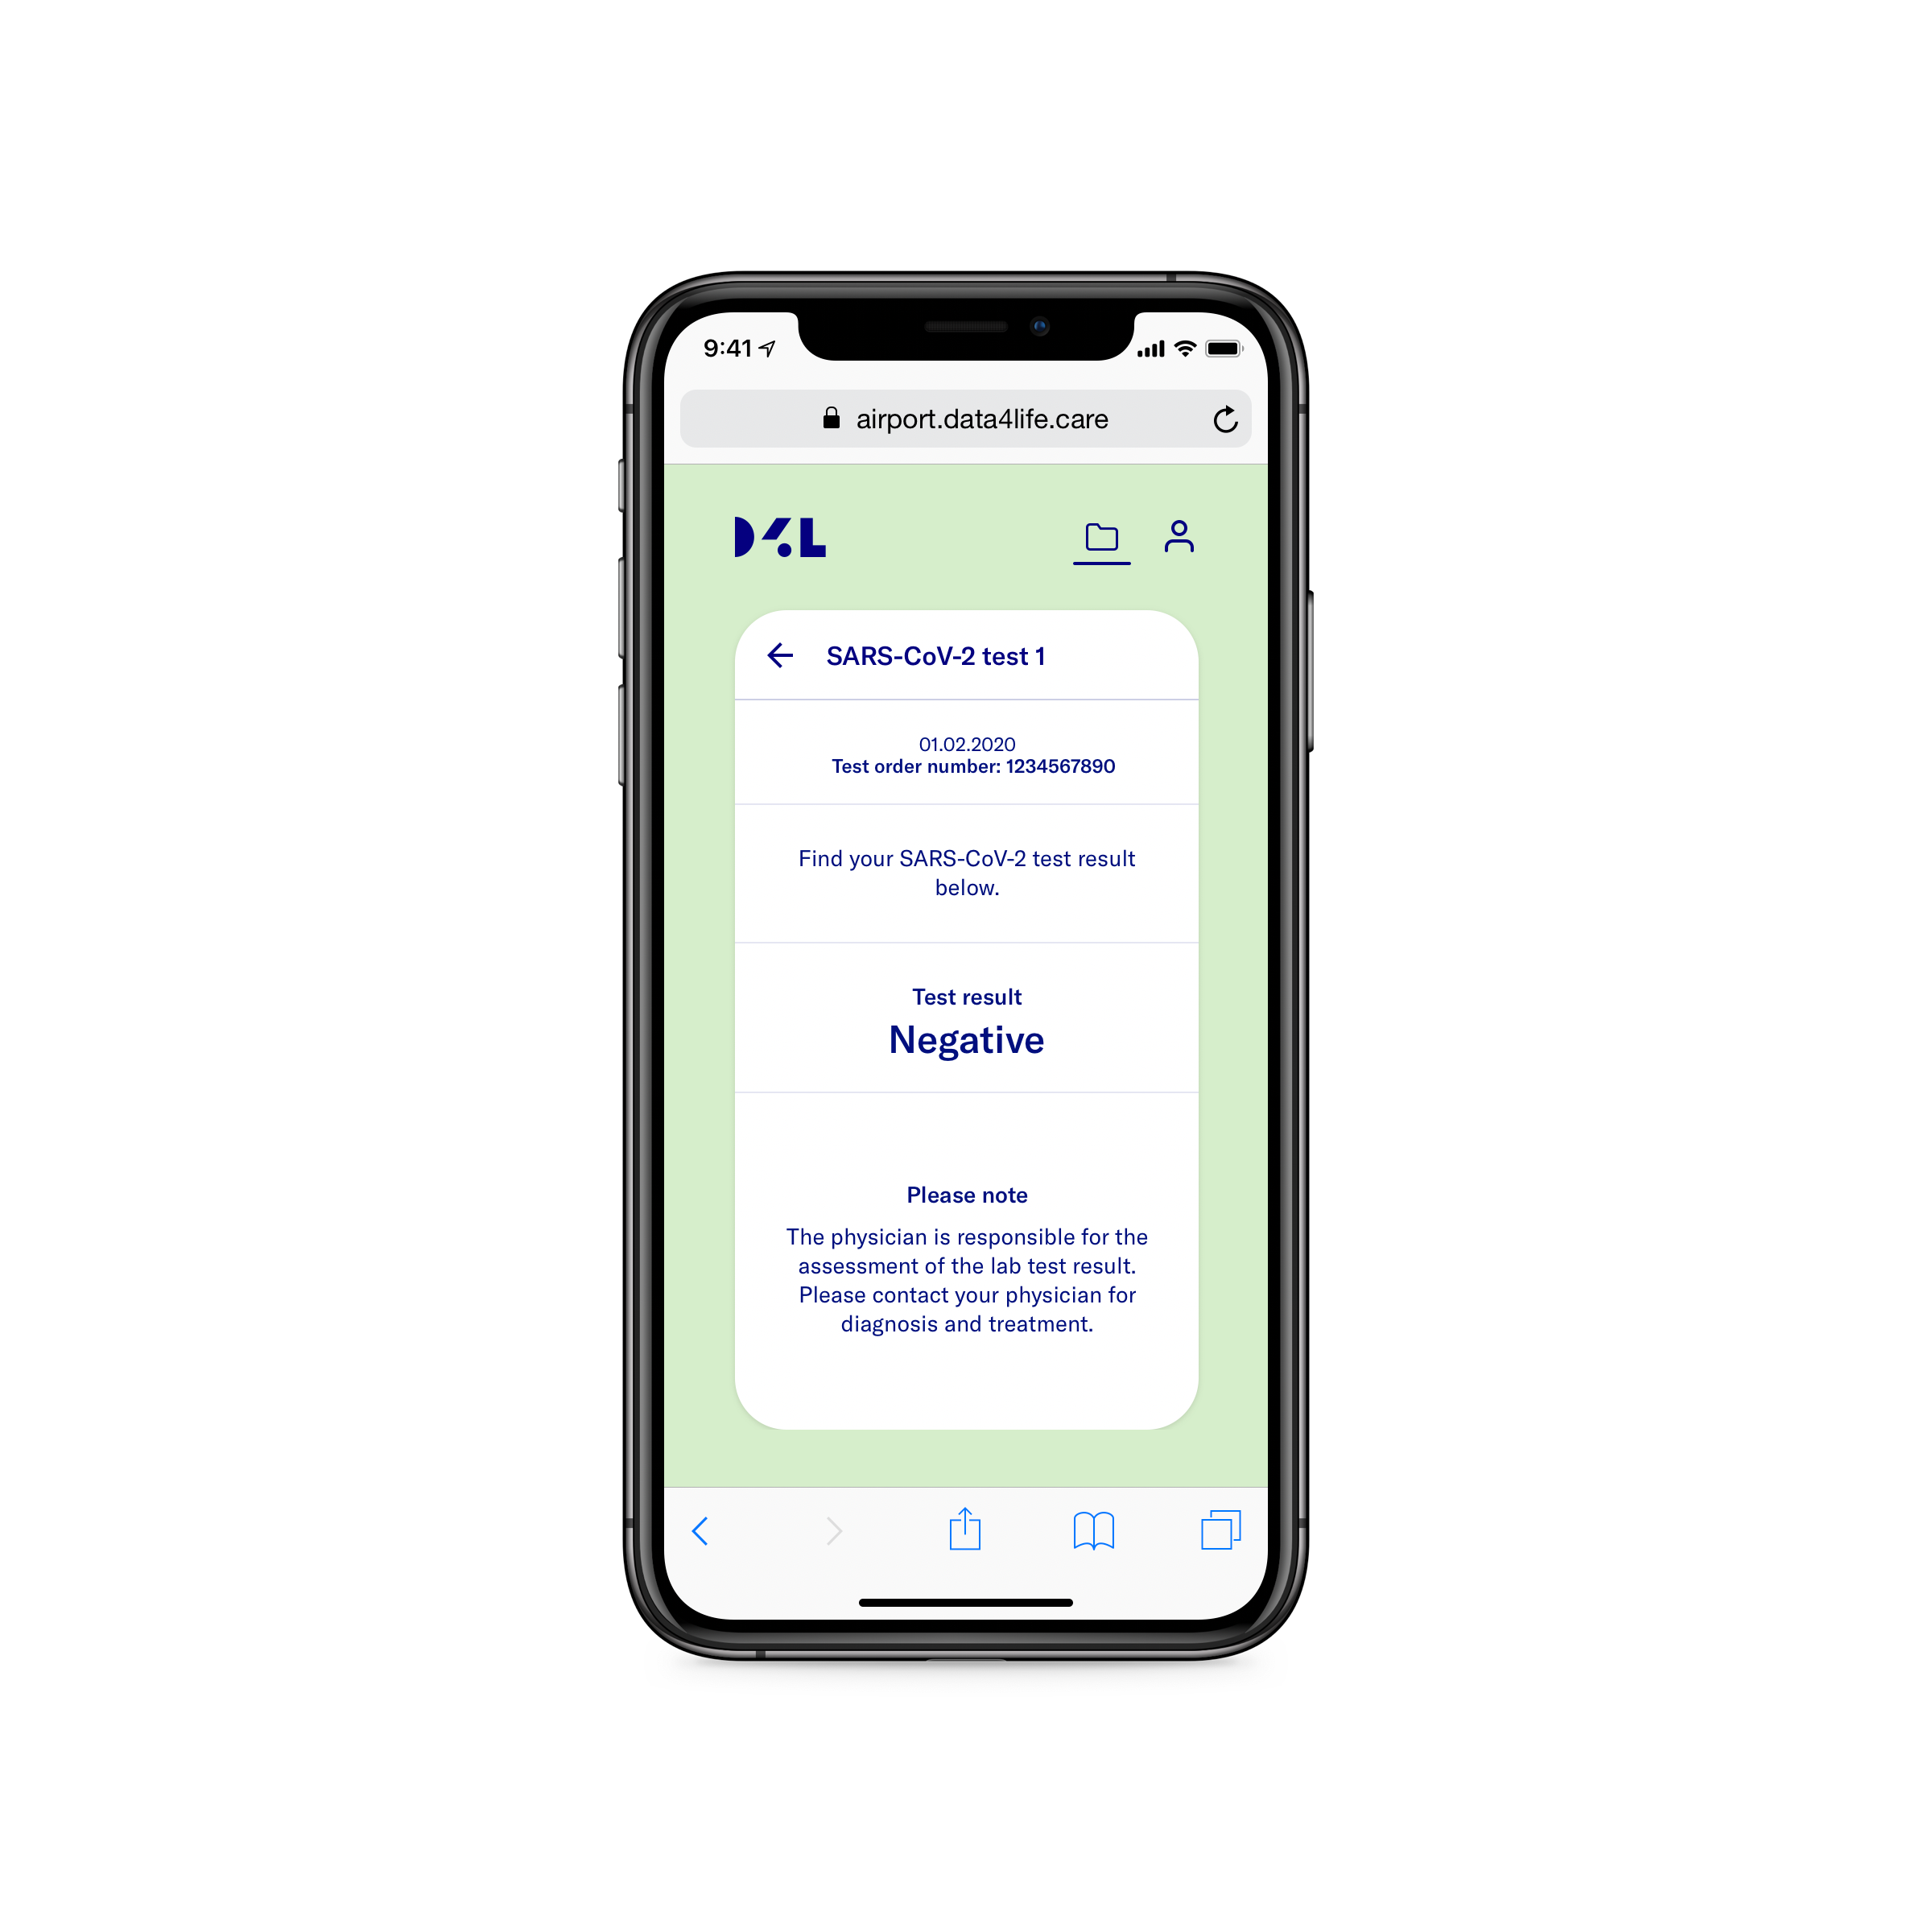
Let’s finally have a look at what the app looks like in reality. Here we show you the app screens that users visit during the test results flow explained above.
The first screen allows the user to request a new EON for a new test. The second screen shows the newly created EON as barcode and numerically, ready to be scanned by medical staff. The third screen displays a list of pending laboratory orders, that is, for which the test results are not yet available. The final screen displays the test result as it came back from the laboratory.
We plan to open source more components of our solution and are happy to answer your questions in the meantime. Please send your questions to we@data4life.care.
Steps in the test result delivery app:
-
Users access the test result delivery website and log in.
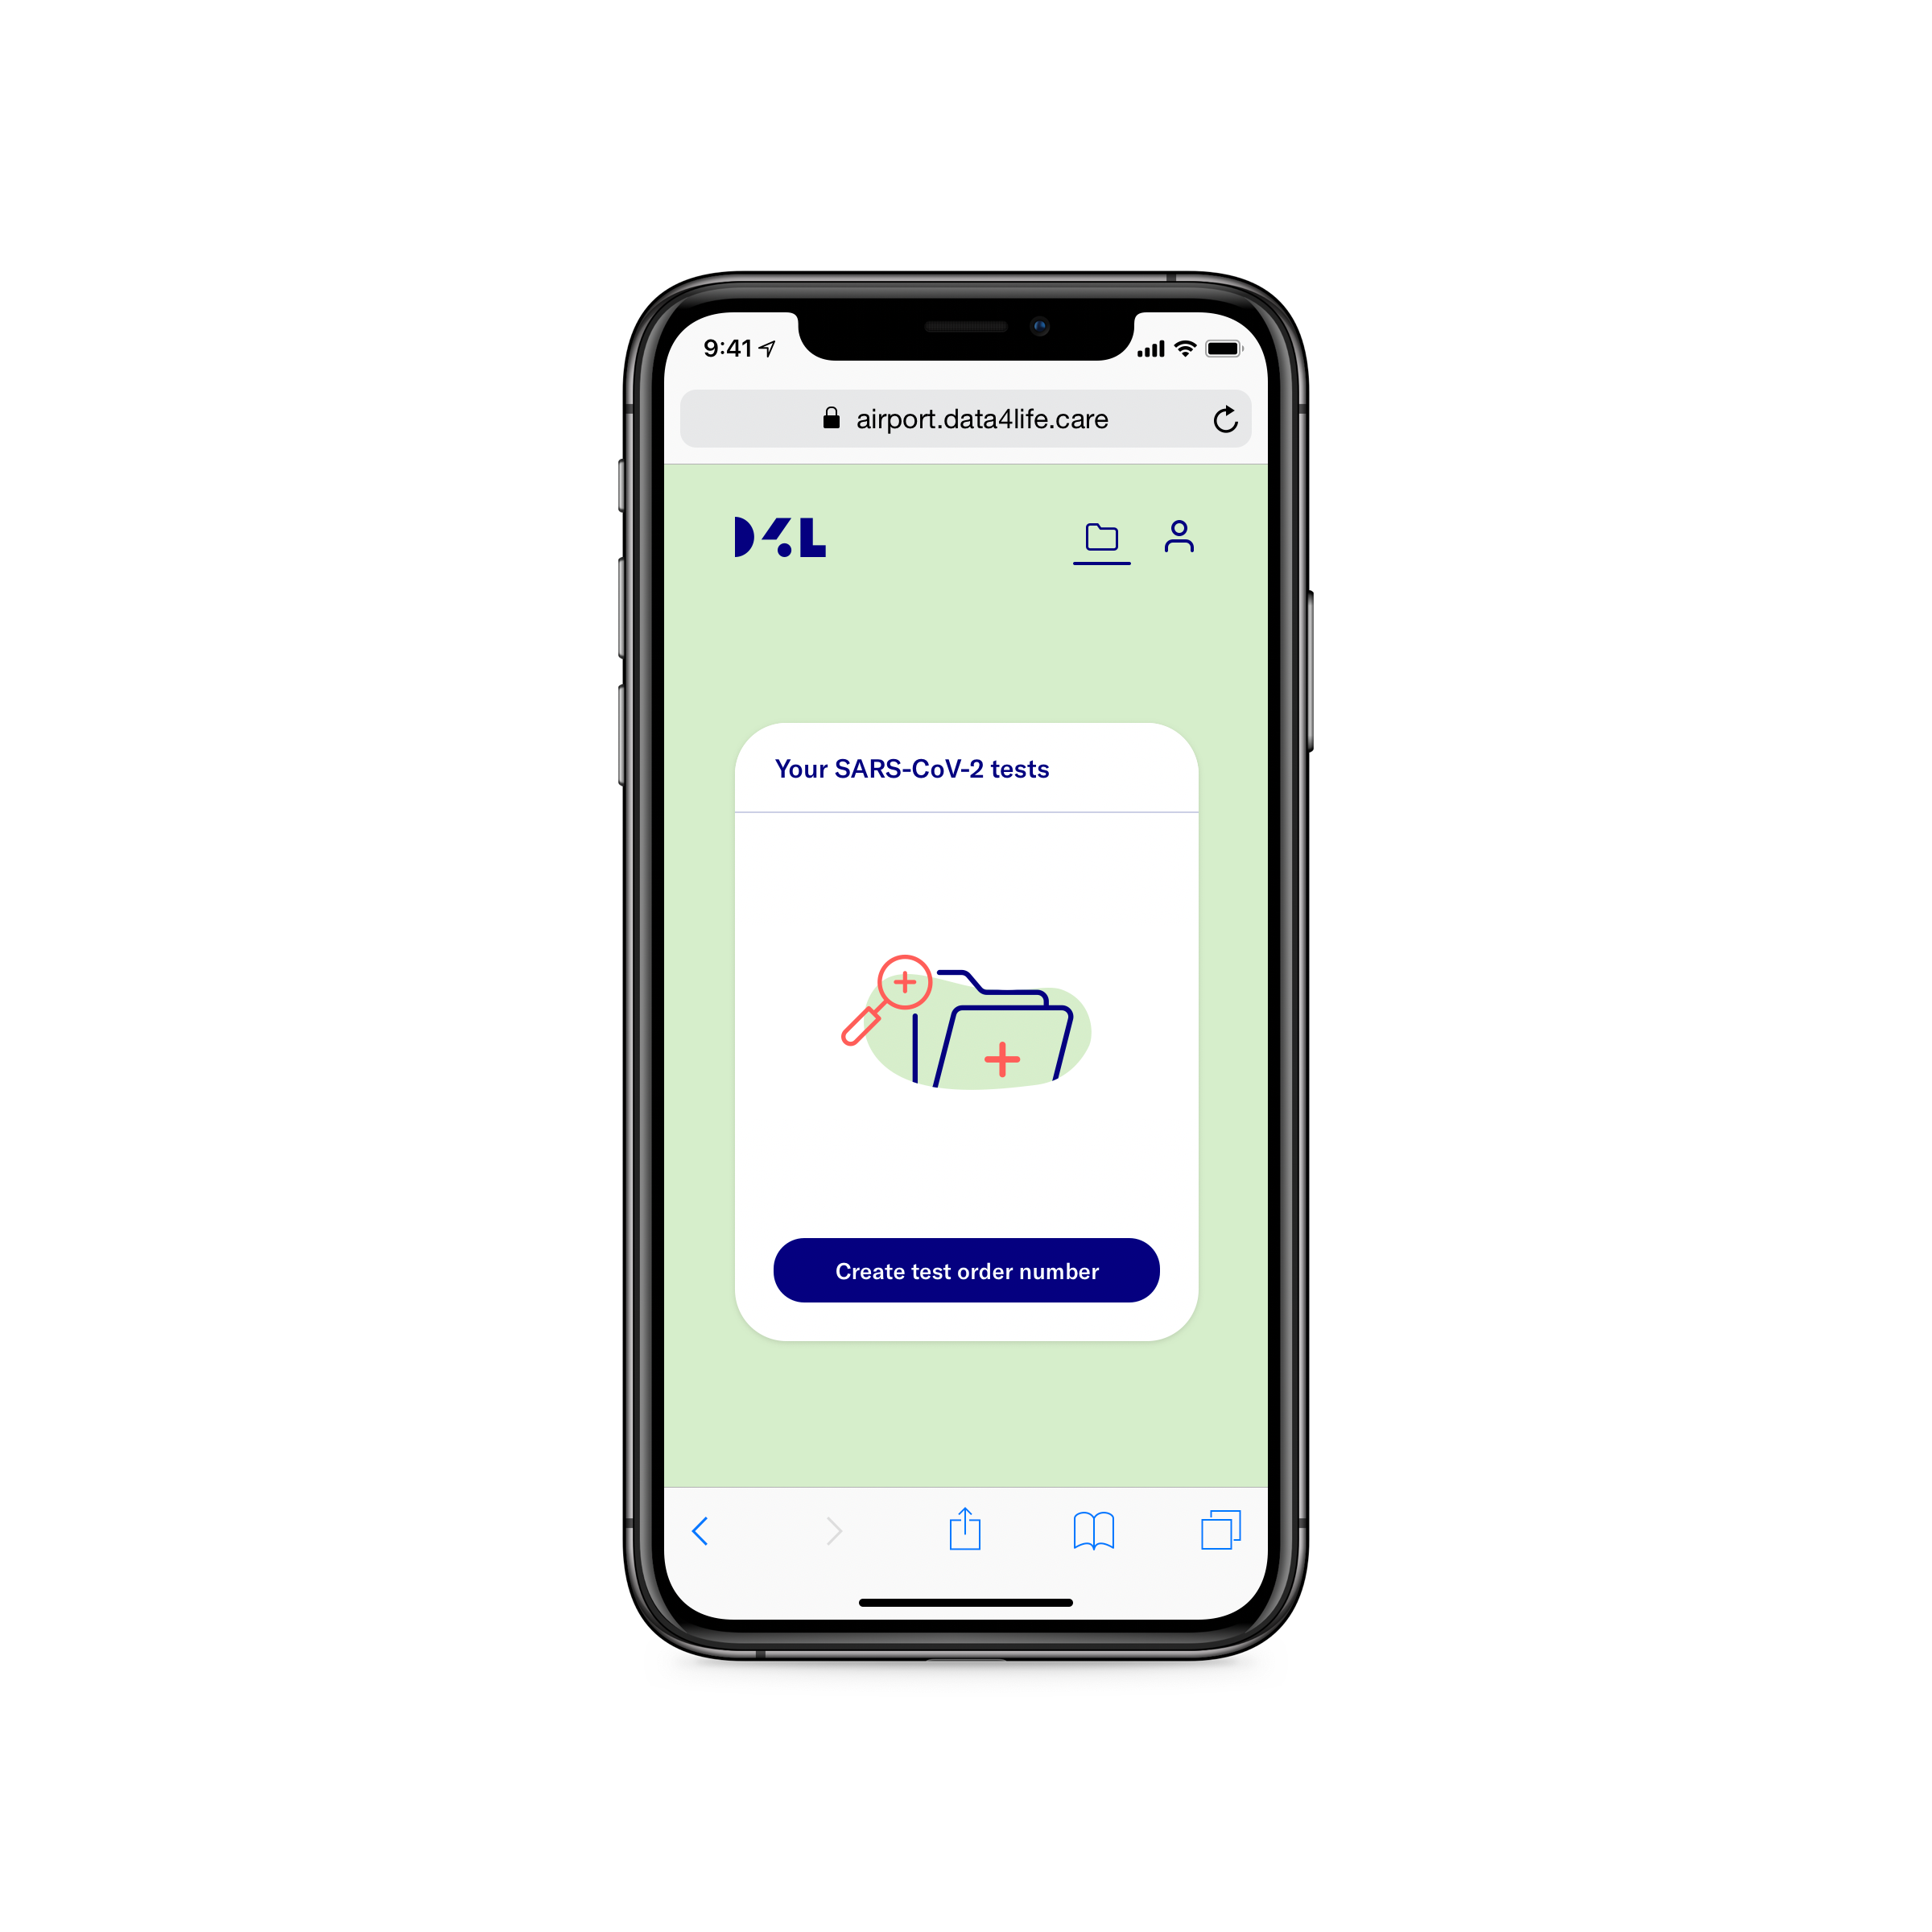
-
Users create order number (EON) with the click of a button. A barcode to represent the number is also created.

-
Users visit the test center.
-
Medical test center staff scans the barcode, performs swab testing, then sends test tube to the laboratory.
-
Users receive the test result in the app as soon as it's available from the laboratory.